
CSV Prerequisites and Base Integration Setup
Integration prerequisites
Prerequisite activities must be completed before the CSV integration can be configured on the ObserveID side. A brief overview of these prerequisites is provided below.
|
Prerequisite |
Description |
|
Number of CSV files |
The CSV integration in ObserveID supports the simultaneous upload of one or more files. This capability is configurable through the integration’s Import Rules. Typical use cases include scenarios where different onboarding access provisioning is required based on the specific file in which a user record is included. |
|
Syntax of CSV files |
The syntax used to create the CSV file must match the format defined for the CSV integration configuration in ObserveID. |
|
Full data, or delta |
The CSV integration supports two upload modes: - Full overwrite, which replaces all existing integration data with the data contained in the CSV file.
In the full overwrite mode, the CSV file must provide a complete representation of the integration dataset. In the incremental update mode, the CSV file should contain only the delta between the current integration data and the new or updated records. |
|
None of blank rows at the end |
The CSV file must not contain any extra blank rows at the end. |
|
Account for ObserveID |
Unless the CSV file is uploaded manually, a dedicated account for ObserveID must be created on the file storage system and granted read permissions. This enables ObserveID to access the file exchange location and import the file. |
FTP prerequisites
To enable the FTP connection for ObserveID, consider the following:
Folder location for the CSV file on the FTP server
ObserveID reads the CSV file from the folder specified in the FTP Location field of the CSV integration configuration. The folder path may be provided using the following format:
ftp://{domain-name}:{port-number}/{folder}/If no folder is specified, the file is assumed to be located in the root directory configured for the FTP server.
Read permissions for the account used by ObserveID
The account specified in the CSV integration configuration—defined by the User and Password parameters—is used by ObserveID to access the FTP server and import the CSV file. This account must be granted read permissions on the designated file location.
TLS/SSL connection to the FTP server
The connection to the FTP server can be secured using TLS/SSL. This requires the appropriate certificate to be installed on the FTP server in advance.
Host name vs. IP address of the FTP server
When a TLS/SSL-secured connection is used, it is important to verify that the host name specified in the server certificate matches the host name associated with the configured IP address.
Firewall rules for inbound FTP connections
Depending on the server configuration, inbound firewall rules for port 21 may not be enabled automatically. It is therefore recommended to verify that incoming FTP connections are permitted through the firewall for port 21 or any other ports configured for the FTP service.
For implicit TLS/SSL connections, firewall rules may also need to be configured for port 990.
File format definition
The parameters specified below define the format and structure of a CSV file and must be populated in ObserveID for a CSV integration in: ObserveID > Identity Automation > Integrations > {specific CSV integration} > Details.
To create a new CSV integration, click New integration in the Integrations grid, and then select the CSV integration type. The Details page opens for filling out the parameters, described in the table below.
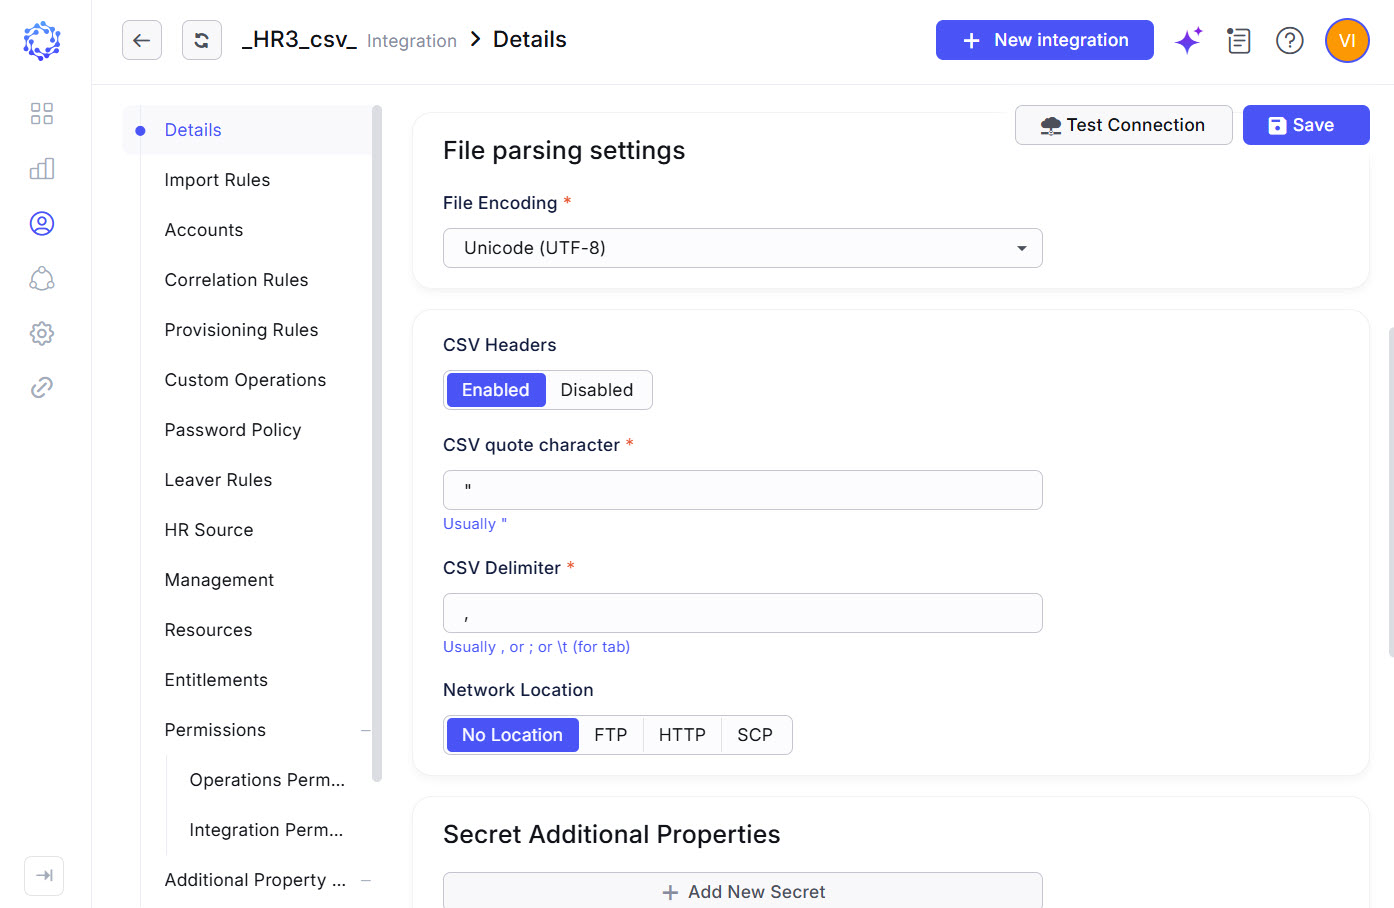 CSV integration configuration
|
Connection parameter |
Description |
|
Environment Type |
Environment the new integration pertains to. The Na option establishes no environment. |
|
Integration Name |
Automatically generated name for the new integration. The name is created by combining the Integration Type with what is established as Environment Type, Alternate Name, and Description for the new integration. |
|
Alternate Name |
Any preferred name for the new integration. |
|
Description |
Any valid text to differentiate one integration from another. This text is displayed in addition to the integration name in several UI elements, e.g., dropdown lists, in the system. |
|
File Encoding |
Character encoding used for the file when it was created. Default value is |
|
CSV Headers |
It is an |
|
CSV Quotechar |
Character to identify a compound value with its own punctuation. Default value is |
|
CSV Delimiter |
Character to separate one value from another. Default value is |
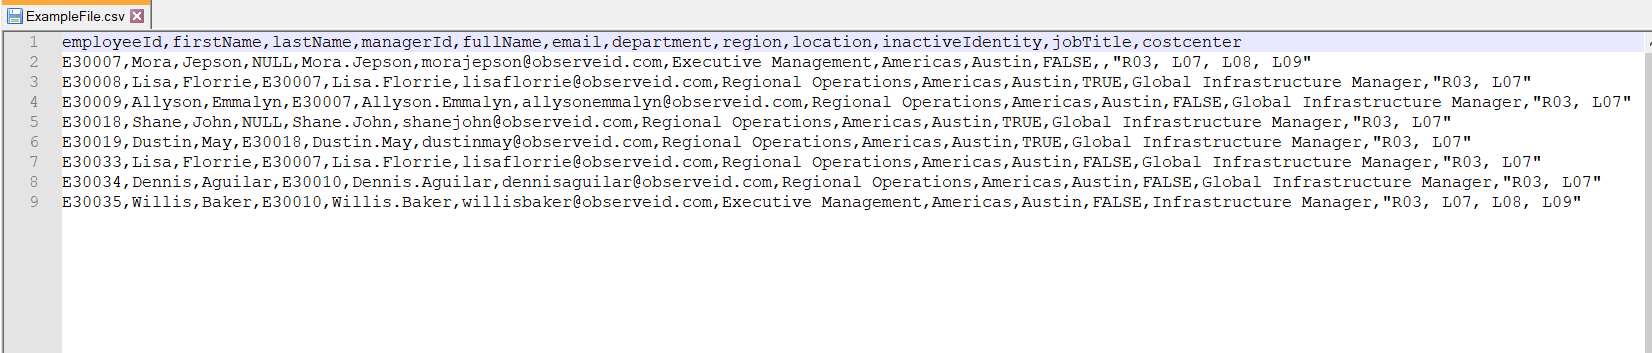 Example of a CSV file
File location setup
The CSV file exchange location is a required setting for configuring the CSV integration on the ObserveID side and is described below.
|
Location |
Parameters |
Description |
|
No Location |
n/a |
The No Location option is established to allow the user to upload a file from their local computer. |
|
FTP |
|
The The For example, tfp://12.231.22.1:21/myfoldername/, or ftp://mydomain.com:21/myfoldername/ If the folder name is omitted, the file is assumed to be placed into the root directory where the FTP server was configured. |
Import Rules configuration
The Import Rules of the CSV integration are used to define the structure of the CSV file, interpret the meaning of the imported data, and map it to the corresponding ObserveID entities (such as accounts, additional properties, and resources).
Because the data model and target systems vary across integrations, the CSV file structure may differ for each CSV integration and must therefore be defined accordingly.
Import Rules are used to configure how data contained in the CSV file is processed and mapped within ObserveID.
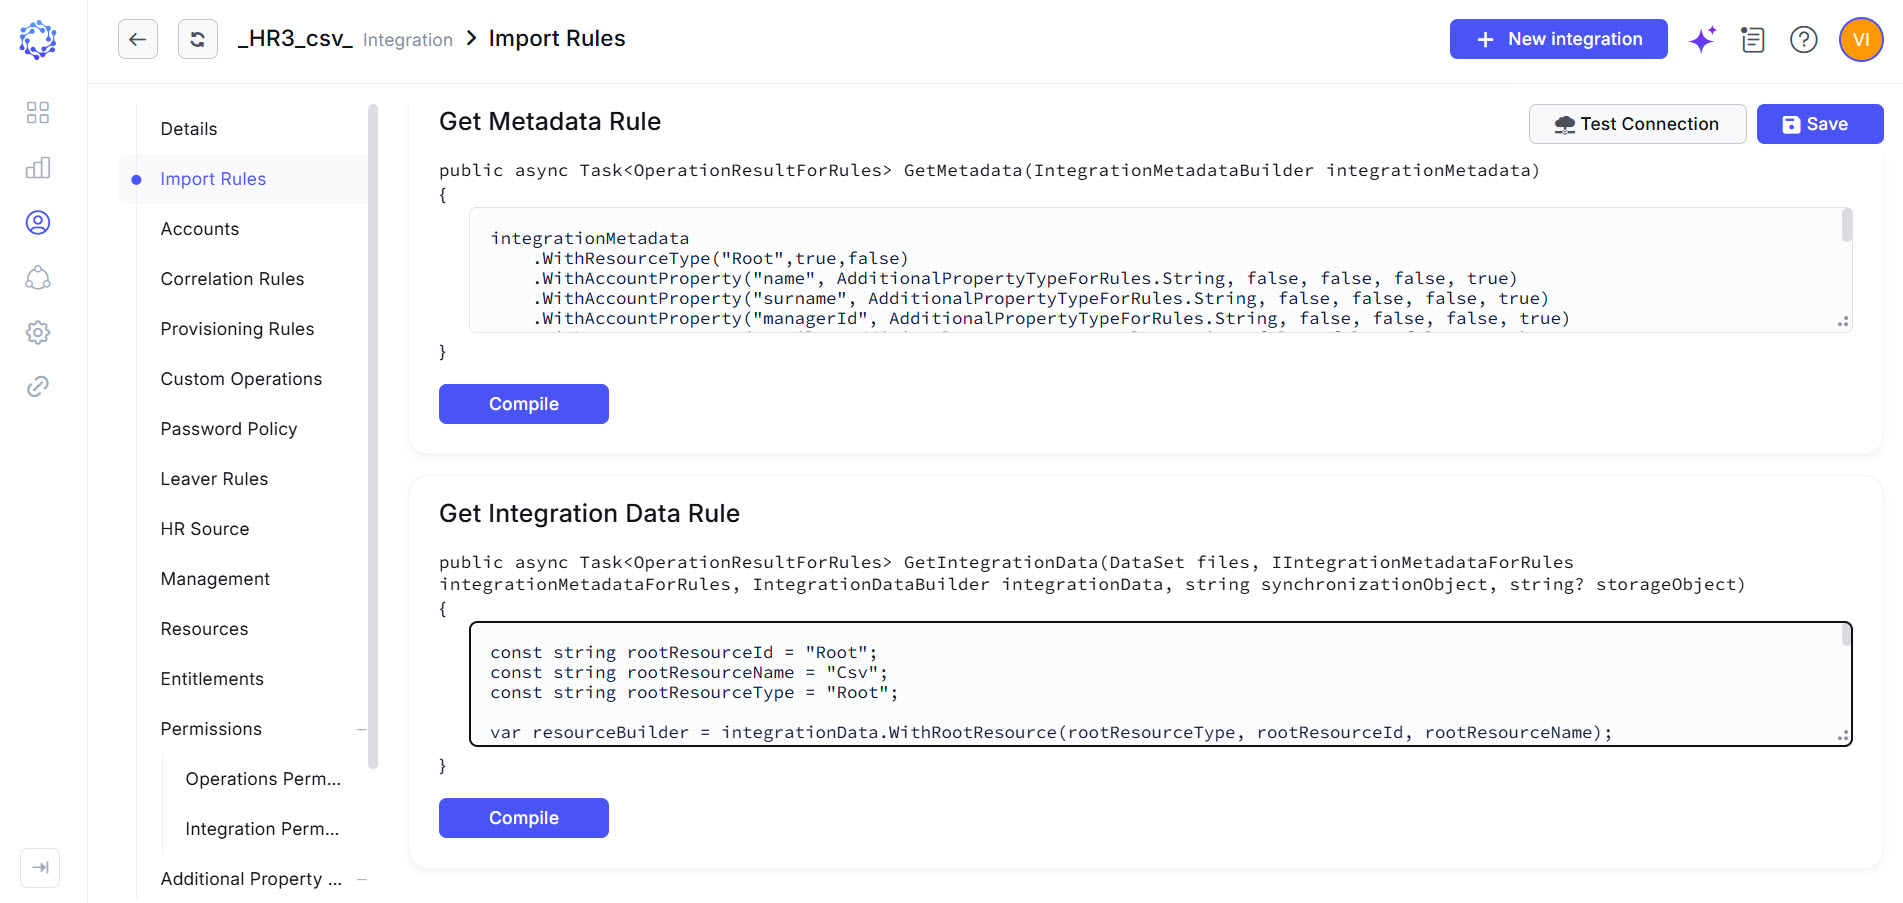 Import Rules
Authoritative Source Use Case
Depending on the availability and constraints of data representation in a specific target system, the approaches used to define the CSV file structure for a given CSV integration may vary.
The Import Rule code samples presented in this section illustrate a scenario in which the CSV integration is used as an authoritative source, providing account records that are sufficiently unique to serve as the primary representation of identities across the organization.
This model limits the data scope: provisioning is not supported and, therefore, no resources or entitlements are managed. Instead, the integration relies on an extended account attribute schema, which is used to create and maintain the organizational identity repository.
Get Metadata Rule
The Get Metadata Rule executes the GetMetadata() method, which returns an IntegrationMetadata object. This object defines the integration data schema, including the attributes expected to be retrieved from the CSV file, and may also contain additional configuration details.
The code sample below illustrates the definition of additional Account attributes, such as managerId, email, department, region, location, jobTitle, costсenter, and other.
integrationMetadata
.WithResourceType("Root",true,false)
.WithAccountProperty("name", AdditionalPropertyTypeForRules.String, false, false, false, true)
.WithAccountProperty("surname", AdditionalPropertyTypeForRules.String, false, false, false, true)
.WithAccountProperty("managerId", AdditionalPropertyTypeForRules.String, false, false, false, true)
.WithAccountProperty("email", AdditionalPropertyTypeForRules.String, false, false, false, true)
.WithAccountProperty("startDate", AdditionalPropertyTypeForRules.DateTime, false, false, false, true)
.WithAccountProperty("department", AdditionalPropertyTypeForRules.String, false, false, false, true)
.WithAccountProperty("region", AdditionalPropertyTypeForRules.String, false, false, false, true)
.WithAccountProperty("location", AdditionalPropertyTypeForRules.String, false, false, false, true)
.WithAccountProperty("jobTitle", AdditionalPropertyTypeForRules.String, false, false, false, true)
.WithAccountProperty("costcenter", AdditionalPropertyTypeForRules.Strings, false, false, false, true)
.WithAccountProperty("fullName", AdditionalPropertyTypeForRules.String, false, false, false, true)
.WithAccountProperty("WorkEmail", AdditionalPropertyTypeForRules.String, false, false, false, true)
.WithAccountProperty("RequestorEmail", AdditionalPropertyTypeForRules.String, false, false, false, true)
.WithOperationPermissions(true,true,false,false,false,false,false,false,false,false,false,false,false,false,false,false,false,true,true,false,false);
return new();
Get Integration Data Rule
The Get Integration Data Rule executes the GetIntegrationData() method, which returns an IntegrationData object. This object represents the data retrieved from the CSV file in accordance with the schema defined in the integration metadata.
In addition, it may include supplementary information required for CSV integration processing, such as the number of imported CSV files, file names, system properties and/or configuration settings, and data validation rules.
const string rootResourceId = "Root";
const string rootResourceName = "Csv";
const string rootResourceType = "Root";
var resourceBuilder = integrationData.WithRootResource(rootResourceType, rootResourceId, rootResourceName);
foreach(var account in files.Tables.Cast<DataTable>()
.SelectMany(x => x.Rows.Cast<DataRow>()))
{
var accountBuilder = resourceBuilder.WithAccount(account[0].ToString()!, null, account[4].ToString()!,
bool.Parse(account[10].ToString()!), false, null);
accountBuilder.WithAccountAdditionalProperty("name", new MixedValueForRules(account[1].ToString()));
accountBuilder.WithAccountAdditionalProperty("surname", new MixedValueForRules(account[2].ToString()));
accountBuilder.WithAccountAdditionalProperty("managerId", new MixedValueForRules(account[3].ToString()));
accountBuilder.WithAccountAdditionalProperty("email", new MixedValueForRules(account[5].ToString()));
accountBuilder.WithAccountAdditionalProperty("startDate", new MixedValueForRules(account[6].ToString()));
accountBuilder.WithAccountAdditionalProperty("department", new MixedValueForRules(account[7].ToString()));
accountBuilder.WithAccountAdditionalProperty("region", new MixedValueForRules(account[8].ToString()));
accountBuilder.WithAccountAdditionalProperty("location", new MixedValueForRules(account[9].ToString()));
accountBuilder.WithAccountAdditionalProperty("jobTitle", new MixedValueForRules(account[11].ToString()));
accountBuilder.WithAccountAdditionalProperty("costcenter", new MixedValueForRules(account[12].ToString()));
accountBuilder.WithAccountAdditionalProperty("WorkEmail", new MixedValueForRules(account[13].ToString()));
accountBuilder.WithAccountAdditionalProperty("RequestorEmail", new MixedValueForRules(account[14].ToString()));
}
return new();
Defining the Availability of Integration Operations
For the CSV integration, it is possible—and recommended—to explicitly define permissions for each integration operation in accordance with its actual availability. A value of true indicates that the operation is allowed, while false indicates that the operation is denied.
WithOperationPermissions(
   getIntegrationDataAndMetadata = true,
   testConnection = false,
   testAccountCredentials = false,
   createAccount = false,
   deleteAccount = false,
   lockAccount = false,
   unlockAccount = false,
   updateAccountCredentials = false,
   updateAccountAdditionalProperties = false,
   grantAccountEntitlements = false,
   revokeAccountEntitlements = false,
   updateResourceAdditionalProperties = false,
   updateEntitlementAdditionalProperties = false,
   detectAccess = false,
   getBlockedList = false,
   setBlockedList = false,
   importShell = false,
   loadFromFiles = false,
   loadFromRemoteLocation = false,
   detectRejectedAccess = false,
   detectAccessTextLogs = false,
   validateCredentials = false)
Initial data load
After the integration configuration and the import rules are set up, and the connection test is successfully completed, next is the first load of data. It allows the systems to set up an initial point starting from which it is possible to determine and synchronize deltas later. For what data is loaded, refer to the schema described with the Import Rules.
A Data Import task is used to perform the initial data load as well as all subsequent data imports.
The Data Import task for the CSV integration is created automatically when the integration is saved. If required, the task can also be created manually. To execute the Data Import task, navigate to:
- ObserveID > Identity Automation > Workflows > Tasks
For the CSV integration, the Data Import task is executed twice: first, via the Import action it brings in the CSV file(-s) from the location; and then via the Trigger action it reads the data from the CSV file. For imports from local computers, it is enough to use only the Import action.
 Import action on the Data Import task
The data upload mode—Full Overwrite or Incremental Update—is controlled by the Update Integration Data checkbox (see the figure below). When this option is selected, only delta records are added. When it is cleared, the existing integration data is fully replaced.
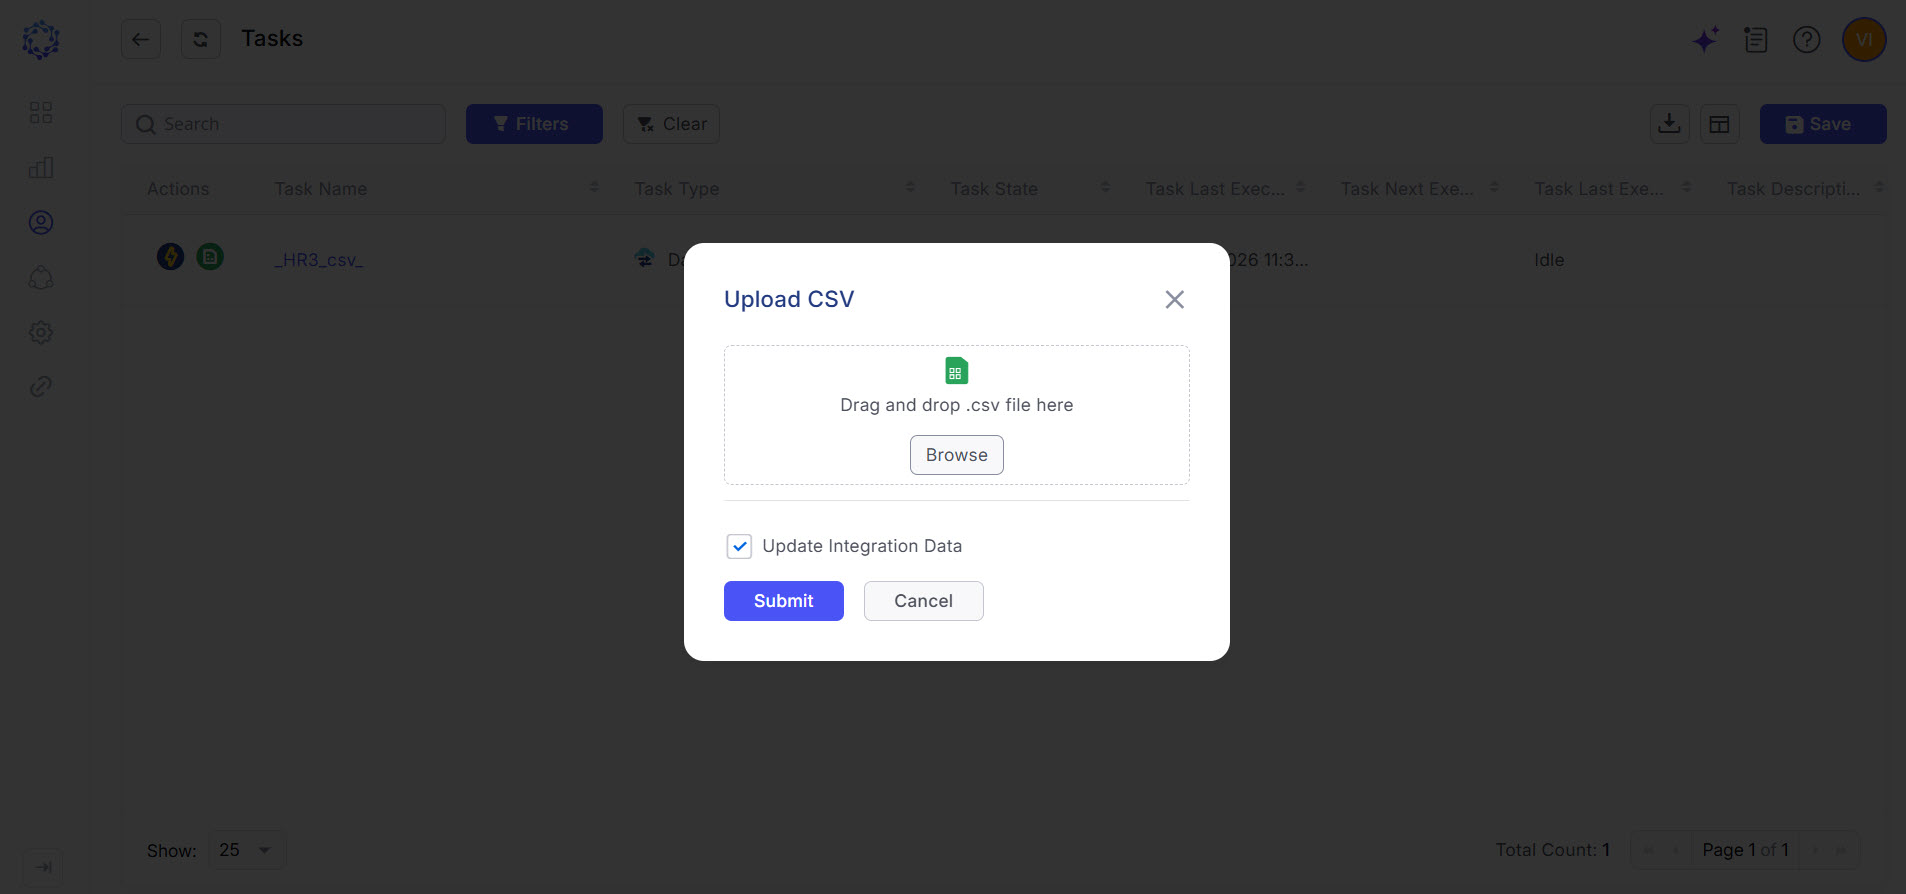 Full Overwrite or Incremental Update
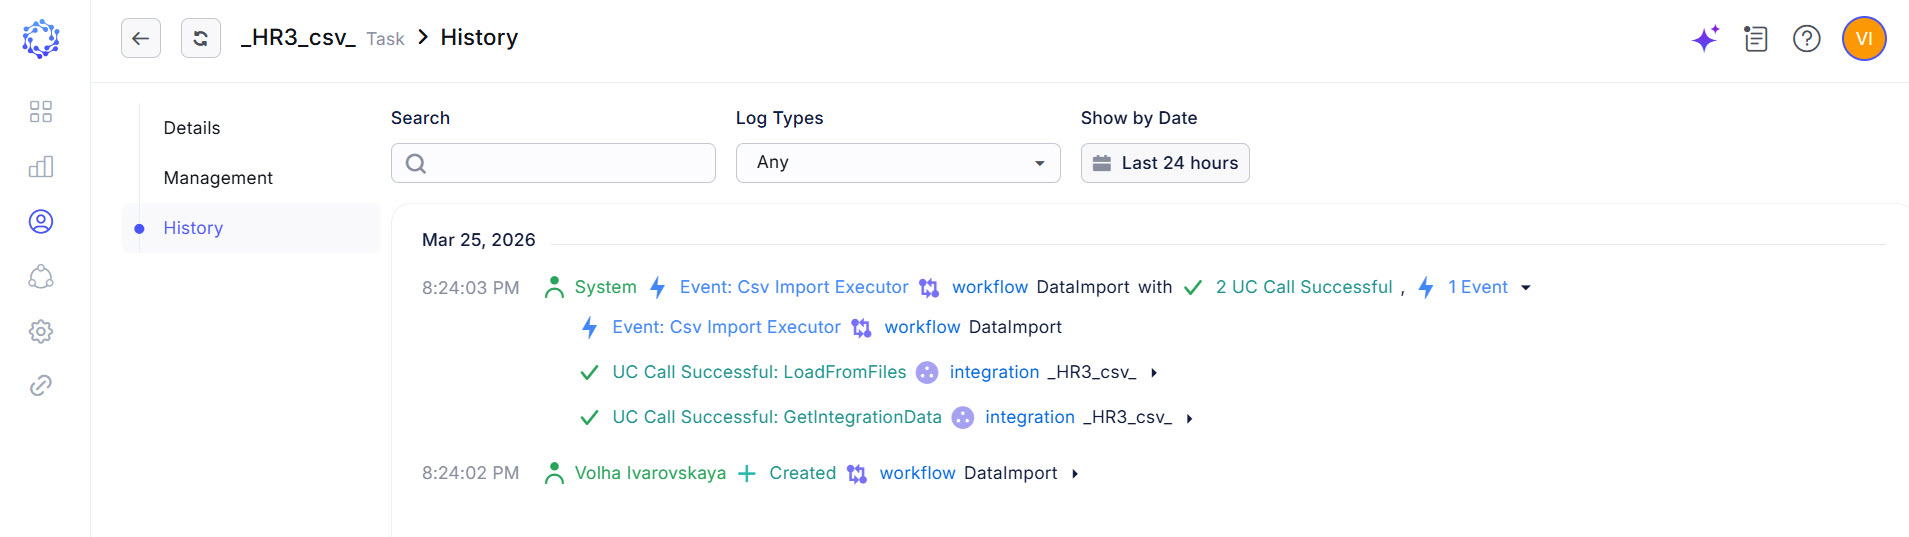
The Data Import task is considered successfully completed when the CSV file data is imported and becomes available within the CSV integration in ObserveID. To view the results of the task execution, click on the task name in the Tasks grid and then select History.
 Task execution results