
Implement Integration Rules with Obi
Among Administration tasks, Obi assists with creating and maintaining integration rules. The communication starts from defining an integration, and if it does not exist yet, Obi can help in creating one,
When creating a new integration, Obi provides a form for entering the required connection parameters. Completing this form, the user is expected to trigger the data import process for the new integration.
After the integration is created, rule configuration follows the same workflow used for other integrations. The process begins with identifying the user’s intent by selecting one of the following options:
- Create a new rule from scratch
- Modify an existing rule
This distinction determines the scope of information that must be provided to Obi in order to implement the requested logic.
For a new rule, the user should understand:
- The integration data model available as input to the rule.
- The set of supported operations that can be performed on the input data.
- The expected business logic and desired outcome of the rule execution.
The user must then describe the logic the rule is expected to execute in order to transform the input data into the required result.
For an existing rule, the goal is to preserve the current implementation while applying partial or substantial modifications to the existing logic. In this scenario, the existing rule serves as the baseline, and only the required changes need to be provided.
Unlike the new rule creation workflow, the rule update workflow does not require redefining the initial implementation context, but instead focuses only on the requested modifications to the existing logic.
Creating New Rule
When creating a new rule, the expectation is that the business logic must be implemented from scratch. As a result, the user is required to provide sufficient information describing the intended behavior of the rule, the business objective it should fulfill, and the expected outcome.
The selected rule type determines the capabilities and operations that can be implemented within the rule. Rule types are described in the subsequent sections of this document. Refer to the description of the applicable rule type to prepare an implementation design for the business case to be implemented through the rule.
Updating Existing Rule
When updating an existing rule, the expectation is that the integration has already been fully configured and that the existing rules are operational. These rules typically implement business logic supporting capabilities such as:
- Data aggregation
- Access control and account administration
- Identity lifecycle management
- Other integration-specific functionality
Integration rules define the custom business logic that enables these capabilities. Therefore, updating a rule requires that an existing implementation already be present. If no business logic has yet been implemented, the scenario should instead be treated as a new rule creation case.
For most rule update scenarios, the guidance provided below is sufficient. However, for new rule creation scenarios, refer to the rule type descriptions provided in the subsequent sections of this document.
Rules Obi can code
Regardless of whether the scenario involves creating a new rule or updating an existing one, Obi can generate implementations for the following rule types:
- Integration Settings Rule
- Account Attribute Provisioning Rules
- Account Termination Rule
- HR Source Rules
Base Approach
The recommended approach to writing code with Obi includes the following steps:
- Review the description of the rule type.
- Understand the purpose of the rule and how it supports the intended business case.
- Draft the implementation vision for the required business logic.
- Break the implementation vision into smaller logical units, where each unit represents a single action or operation.
- Start a new chat with Obi using the prompt: "
Let's update an integration". - Select the target integration.
- Select the rule to create or update.
- Copy and paste one logical unit from the implementation vision into the chat.
- Generate the implementation code with Obi.
- Save the generated code to the rule in the integration configuration.
- Execute the rule.
- Verify the results.
If the results are correct, repeat steps 8–12 until all logical units have been implemented and validated as part of the complete business logic workflow.
If the results do not match the expected outcome, proceed with troubleshooting.
Troubleshooting
Troubleshooting is more effective when the implementation vision is divided into single-action logical units. This creates an iterative development workflow in which each iteration introduces one isolated change.
If previously implemented actions function correctly but the newly added action introduces incorrect behavior, the issue can generally be isolated to the most recent iteration.
The following steps can be used to troubleshoot the implementation:
- Start a new chat with Obi.
- Copy the failing code and paste it into the chat, asking Obi to explain the implementation logic.
- Review the explanation generated by Obi.
- Identify potential misinterpretations or incorrect assumptions in the implemented logic.
- Describe the required correction or intended behavior adjustment.
- Generate an updated version of the code with the correction applied.
- Execute the updated code.
- Verify the results.
How to Select an Integration
When working with rule implementations, it is important to define the target integration in order to narrow the context from general platform behavior to the specifics of a particular integration.
The required integration may already exist, or it may need to be created. If the existence of the integration is uncertain, if the exact integration name is unknown, or if there is any ambiguity regarding the target integration, it is recommended to start the conversation with Obi using the following prompt:
Let's update an integration
Obi then provides a list of all existing integrations. This simplifies identification of the required integration and helps determine whether a new integration must be created.
If the integration does not yet exist, Obi can guide the user through the integration creation workflow by requesting the integration type and presenting a form for entering the required configuration parameters.
After the integration has been created, execute the data import request for the new integration. Once the import has completed successfully, start a new chat with Obi, using the integration update prompt above and select the newly created integration.
This prompt establishes the user’s intent as rule-related configuration work and directs the workflow toward the available rule implementation options.
How to Execute Code
The rule type determines the execution method required to run the implemented logic. Use the table below to identify the appropriate execution method for each rule type.
Before executing the rule, ensure that the required test data has been prepared.
|
Rule Type |
Execution Method |
Description |
|
Integration Settings Update Rule |
A Data Import request |
When the Data Import request is triggered for a specific integration, the Integration Settings Update Rule is executed. |
|
Account Attribute Provisioning Rule |
Any of the following requests triggered for a specific integration:
|
A Data Import request retrieves changes from the target system and synchronizes them into the integration data model. For example, if an account attribute is modified directly on the target system, the updated value becomes visible within the integration data after the Data Import process is executed. When an account is created or updated through an access-related request (such as a permanent access request, temporary access request, access management request, or onboarding request), the target account’s additional properties are recalculated in accordance with the applicable provisioning rules. One of the primary functional capabilities of an Identities Update request is the recalculation and synchronization of additional account properties. |
|
Account Termination Rule |
An Offboarding request |
An Offboarding request can be triggered by either an HR Source Check request or an Emergency Deprovisioning request. A prerequisite for processing the request is that the beneficiary identity owns at least one account associated with the target integration. |
|
HR Source Joiner Rule |
The following set of actions:
|
When a HR Source Check request is triggered for a given integration, the request evaluates the current integration data. If the integration data has been updated through a Data Import operation and contains changes matching the conditions defined in the Joiner Rule, the Joiner Rule is executed as part of the HR Source Check process. |
|
HR Source Leaver Rule |
The following set of actions:
|
When a HR Source Check request is triggered for a given integration, the request evaluates the current integration data. If the integration data has been updated through a Data Import operation and contains changes matching the conditions defined in the Leaver Rule, the Leaver Rule is executed as part of the HR Source Check process. |
|
HR Source Attribute Mapping Rule |
Any of the following requests triggered for a specific integration:
|
Each time these requests are executed, the HR Source Attributes Mapping Rule is also executed as part of the identity synchronization workflow. For an Identities Update request to update identity data, the corresponding configuration toggle must be enabled within the request configuration. |
How to Verify Results
After a rule has been executed, the resulting changes should be verified based on the type of logic implemented and the affected system objects.
The table below describes which objects may be updated as a result of rule execution and how to validate the corresponding changes.
|
Rule Type |
Update Object |
Description |
|
Integration Settings Update Rule |
Settings for integration data |
To verify changes in the settings, review any of the following integration data elements:
The integration data can be accessed from either the Integrations area, or the Analytics area of the platform. |
|
Account Attribute Provisioning Rule |
Additional properties of accounts |
To verify changes to account properties, review any of the following locations:
|
|
Account Termination Rule |
Status of accounts |
To view changes to the account status, review any of the following locations:
|
|
HR Source Joiner Rule |
Status of identities |
To view changes to the identity status, review any of the following locations:
|
|
HR Source Leaver Rule |
Status of identities |
Same as above |
|
HR Source Attribute Mapping Rule |
Identity data |
To verify changes to the identity data, review any of the following locations:
|
One-Action Chunks
Writing effective prompts requires analyzing the overall objective and breaking it down into smaller logical units. There are two primary reasons for this approach.
First, highly complex prompts may contain ambiguities, implicit assumptions, or incomplete requirements. This often increases the need for repeated clarification and additional iterations before a functional implementation can be produced.
Second, complex prompts frequently produce outcomes that are difficult to validate because multiple operations and expected behaviors are combined into a single request.
The recommended approach is iterative: divide the implementation objective into one-action chunks, where each chunk represents a single logical operation. Process these chunks sequentially and proceed to the next step only after the previous one-action chunk has been successfully implemented and validated.
The examples below compare a complex prompt with a one-action prompt to illustrate how prompts should be structured to achieve predictable and accurate results.
Example 1
Complex prompt: Can you update the current version of the Integration Settings Update Rule, so that the rule defines an owner of the account based on the similarity of an Identity Name with the Name field of an XYZ account. If these two match, then the Identity should be assigned as an owner to the account. If the owner is established for an account, then set the account type to "user", otherwise leave it "orphan".
One-action prompt 1: Implement the logic: if the XYZ integration account name match the identity name, then the identity is assigned as the owner of the XYZ integration account.
One-action prompt 2: Add the next logic: if the owner is established for an account, then set the account type to "user", otherwise leave it "orphan".
Example 2
Complex prompt: Please update the rule logic with the following: first, check that all accounts of the XYZ integration have the following settings: requestable - no, rotatable - no, auto approved - no; then if these settings are different, set the specified values.
One-action prompt: Update the rule with the following logic: all accounts of the XYZ integration must have Requestable = No, Rotatable = No, Auto Approve = No.
Compiled Code
Depending on the LLM model in use, the quality of prompt interpretation and generated responses may vary. Multiple factors can influence model performance, including the scale and duration of model training, model specialization, reasoning capabilities, and optimization for decision-making or code generation tasks.
Analyzing complex prompts and generating reliable implementation code is often an iterative process that requires refinement from both the user and the AI assistant before the expected outcome can be achieved consistently.
The primary objective of Obi when generating rules is to produce compiled code that is sufficiently complete and ready to be saved directly into the integration configuration. Compiled code is displayed as a black code block (see the screenshot below).
If the generated code is displayed as a white code block, this typically indicates that the code has not been compiled. In many cases, such output represents a high-level conceptual approach to solving the problem rather than an executable implementation.
If non-compiled code is generated, review and refine the prompt using the Edit Prompt option to make the requirements more explicit and unambiguous. Alternatively, a different LLM model may be selected or configured.
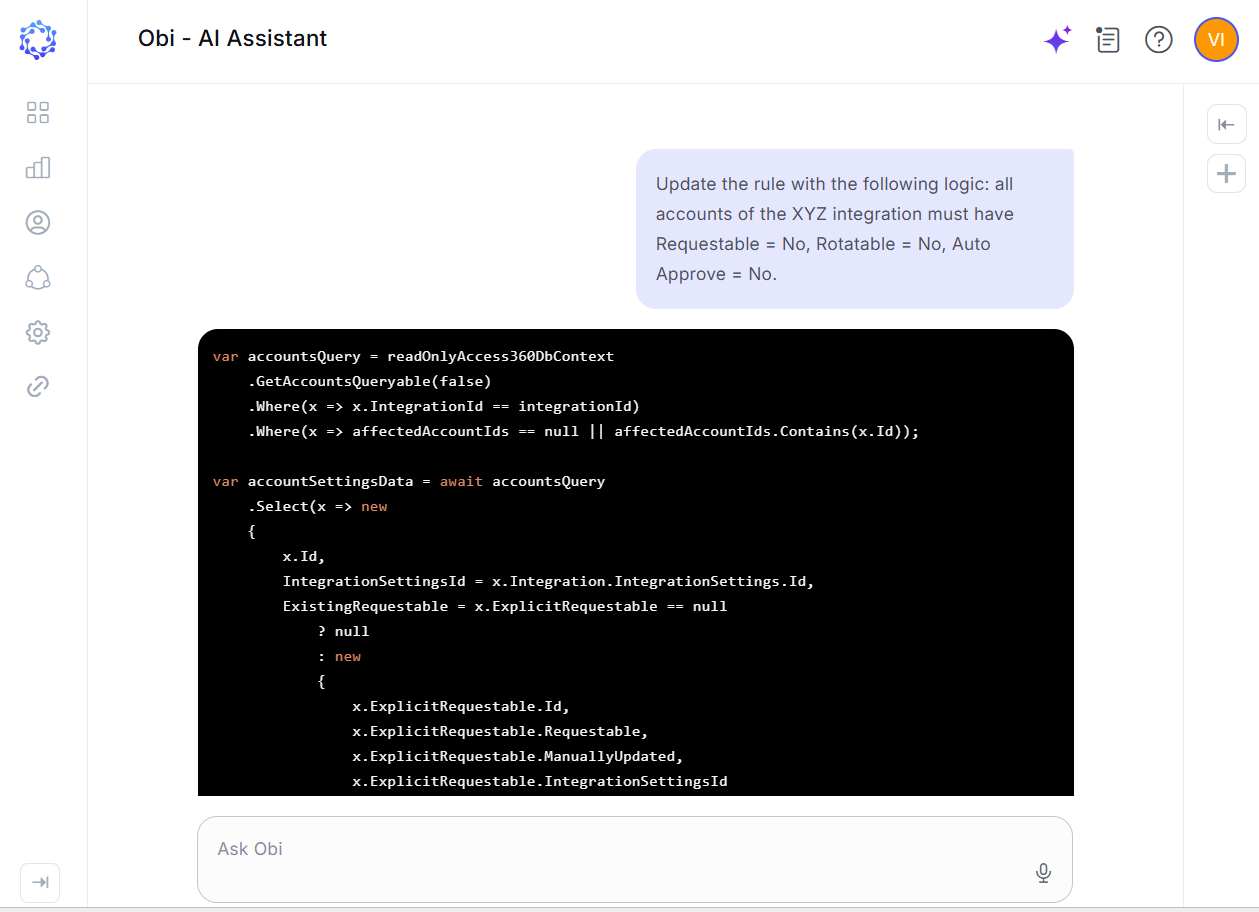 Compiled code
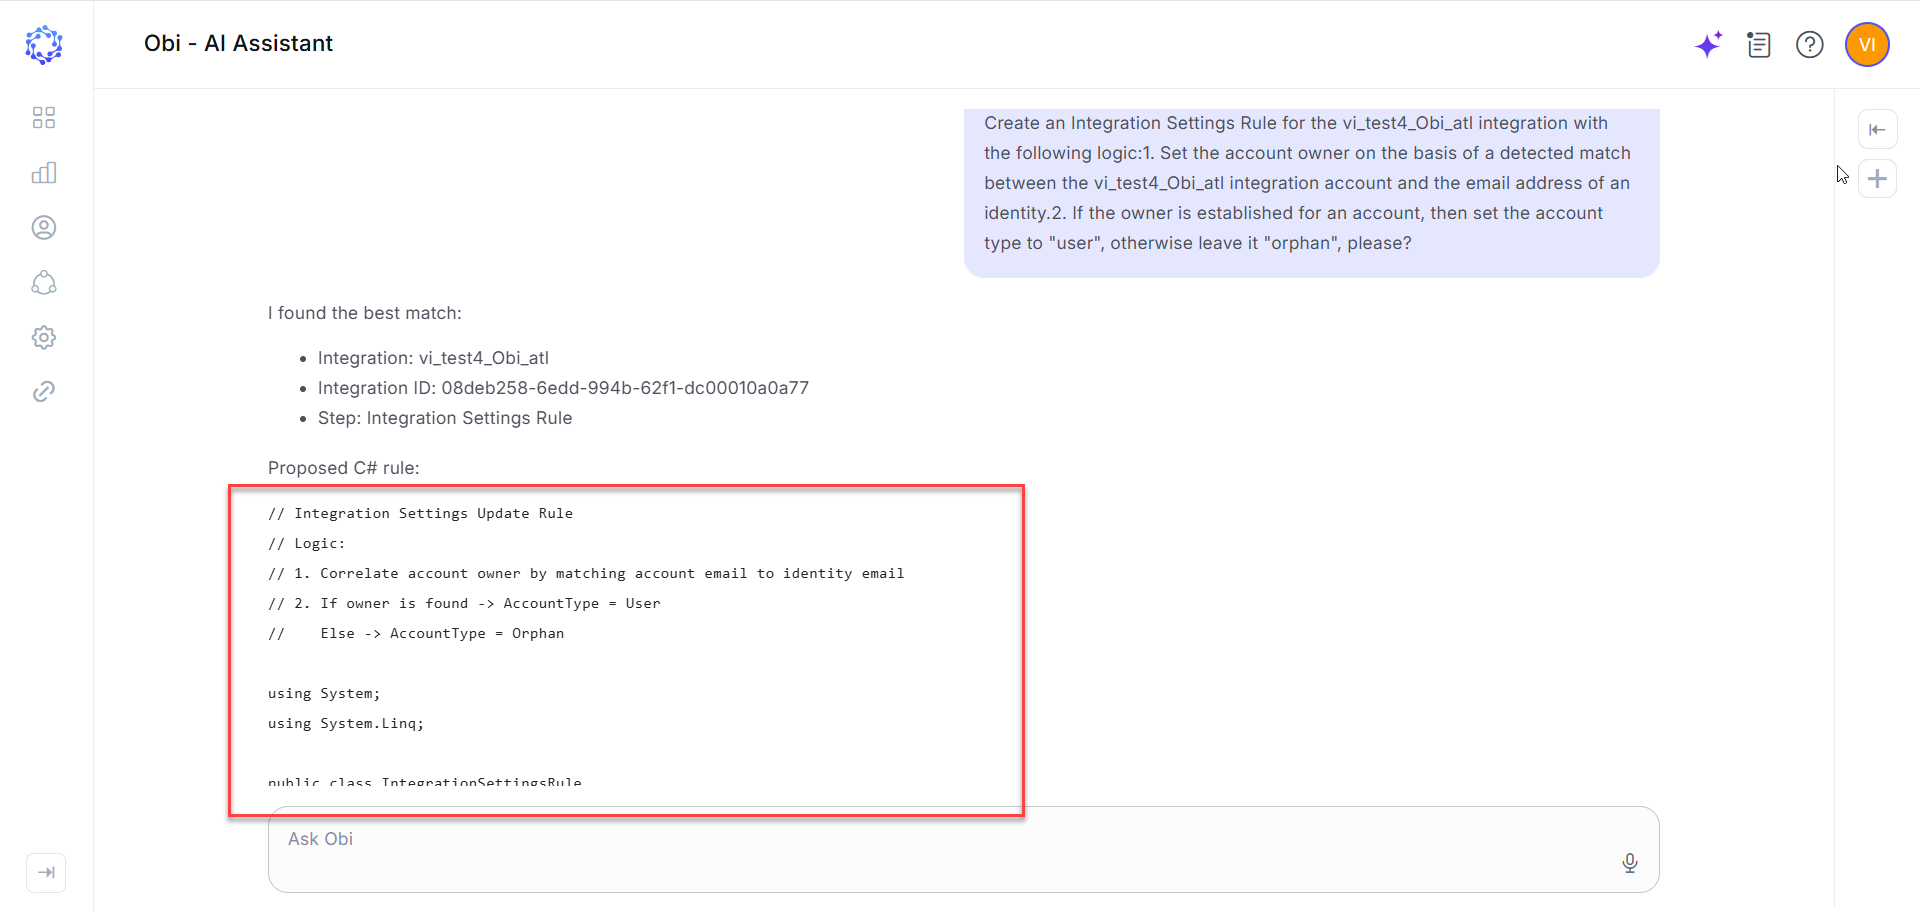 Non-compiled code